 When I started using this ZFS NAS for additional tasks, I realised that my boot environment was becoming more important, and was a weak point in this system.
Initially I wanted to run a master copy of this website locally on this ZFS server, and that entailed installing WordPress and the OpenSolaris AMP package comprising of the Apache HTTP server, MySQL and PHP. Also, I enabled and configured the VNC server. All of this required a fair amount of configuration and I didn’t want to have to do it again in the event of drive failure. Once is enough, so I wanted to discover how to backup and restore my boot environment to protect my investment in time and painstaking configuration work.
Also, there were the users and groups. In addition, I intend to install a version control system like git or equivalent. And there will also be development tools including C, Java, Perl, PHP, Python, Ruby, SQLite etc.
When I damaged and rendered unbootable my previous Solaris boot drive here, although I had the system up and running in around 3 hours or so, it was a very simple system setup. Once I get all the software I want up and running on this system, it would take longer to restore the boot environment. However, with snapshots and zfs send / receive, we’ll see how to make archive backups of the boot environment.
Now the boot environment is becoming more complex and valuable, it’s time to consider setting up a redundant mirrored root boot environment using two similar sized drives.
There were a couple of other considerations: (1) I had run out of existing SATA ports on this motherboard, and (2) I didn’t want to use mechanical, vibrating, power-consuming, noisy and heat-producing drives for my boot pool that are mostly idle.
SATA controller card
Lack of free SATA ports meant acquiring a new SATA controller card, and there were only two real candidates, and both from a great company called SuperMicro. These have the advantages of supporting 8 SATA drives and being well supported in Solaris.
The first possibility was the 8-port AOC-SAT2-MV8 card which has a good Solaris driver and is well regarded, but the problem with it, from my perspective, is that it uses the PCI-X interface to the motherboard and this is only available on a small number of server motherboards and PCI-X seems be old technology now. It will run on my motherboard (Asus M2N-SLI Deluxe), but only in 32-bit mode using a standard PCI slot, which is slower and doesn’t use the card to its potential. This was a possibility but not optimal, and so not my first choice.
The second possibility was the 8-port AOC-USAS-L8i card based on the well-supported LSISAS1068E controller chip. At first glance this AOC-USAS-L8i card appeared to be exotic and unfamiliar hardware, so I dismissed it initially. The card has only two physical ports on it, but each of these two mini-SAS ports feed 4 SATA ports, thus the card supports 8 SATA connectors, and each SATA lane is at the full SATA II spec of 3 Gbits/sec. The other great advantage of this card is that it uses a much more modern, faster and commonly found PCIe interface (PCI Express), and it can auto-negotiate the operating speed according to the slot it finds itself in. Luckily I had a spare PCIe x16 slot free so this was the card for me. You need to get some special cables for it too, like these. These are about $10 or so, and have the disadvantage that they are harder to find on-sale than standard SATA cables, but they have the big advantage that they lock into place on the card, and so don’t come loose. After reading of other Solaris users having success with this card I bought one and it seems to be working well now.

|

|
New mirrored SSD boot drives
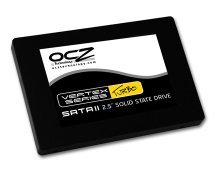
I thought I’d try out a couple of the smallest and cheapest MLC-based Solid State Drives that have started to become more affordable for non-enterprise users. OCZ was a name that started appearing everywhere, and I saw they made a good range of different budget-priced SSDs. After reading a few articles like this excellent one from AnandTech: The SSD Anthology: Understanding SSDs and New Drives from OCZ, I decided to avoid the absolute cheapest OCZ drives based on the JMicron JMF602B controller as this controller has well-documented patchy performance problems. However for a small additional premium, I found the OCZ Vertex series of SSDs, based on the far superior Indilinx Barefoot controller, and the 30GB model looked like it should offer sufficient capacity for a ZFS root boot pool supporting a number of Boot Environment versions: snapshotted GRUB-bootable versions of the OS code, that allow you to boot different versions of the OS, and roll back if an upgrade fails, back to a known working version. As they are snapshots, you may also use ‘zfs send’ to send a stream of the OS boot environment to archive storage for restoration in the event of complete loss of your boot drives. Very cool, as you will see later!
 I saw that OCZ had just recently announced the OCZ Vertex Turbo range of SSDs which gave maximum read speeds of around 240 MBytes/sec and maximum write speeds of around 145 MBytes/sec, or 100 MBytes/sec sustained, which is pretty good. The firmware currently is at level 1.0 which should be slight cause for concern, but these devices are an evolutionary update from the original Vertex series which has good firmware, and they have added a 64 MByte cache. I believe the version 1.0 of the Vertex Turbo series of SSDs provides TRIM support, a technology used to restore write speed to previously written-to MLC memory cells by doing a kind of garbage-collect sweep through the cells. This TRIM process seems to be a collaboration between the storage host’s (1) OS, (2) file system, and (3) the SSD’s controller firmware, although I’m new to this so I may have made mistakes here. Even if the OS and file system are not TRIM-aware, then there is a utility you can use from OCZ which can be used manually if required. As these SSDs are mostly read-only for the purposes of booting the OS and loading supporting files, write-speed degradation associated with MLC SSDs shouldn’t be too much of an issue.
So I bought two 30GB OCZ Vertex Turbo SSDs, and a Scythe 2.5″ Twin Mounter to fit the two SSDs into a standard 3.5″ drive bay. Actually I had run out of 3.5″ drive slots in this case, so I screwed this twin mounter onto an existing 3.5″ to 5.25″ drive adapter to enable these two 2.5″ SSDs to be mounted in a 5.25″ drive bay. It looks a bit silly, but it does the job. One problem I encountered was that because the SSDs are so close to each other, the power and SATA connectors put a lot of strain on the PCBs in the SSDs by bending them apart. Must find long-term solution to this later…

|

|
Preparing for migration of existing root pool
I had previously installed my OpenSolaris 2009.06 onto a single 160GB 3.5″ IDE drive. I wanted to create an exact copy of this boot configuration, including the user accounts, AMP configuration, WordPress, VNC server setup.
My initial idea was simply to attach one of the SSDs to the existing IDE drive to form a mirror using the ‘zpool attach’ command, but this was not possible due to the new drive being smaller than the existing one! So it had to be done the hard way — always the way!
The process would entail making snapshots of the file systems within the existing boot pool and then sending streams of the files referenced by these snapshots to my main storage pool. The idea would then be to disconnect the IDE drive, plug in the two SSDs, install a fresh copy of OpenSolaris 2009.06 onto one of the SSDs, then create the mirror by use of the ‘zpool attach’ command, and finally restore the contents of the previously archived streams from the main data pool onto the boot pool mirror. As usual, there were complications along the way, just to make things more interesting…
Archiving streams of the file systems in the existing root pool
The first step was to create snapshots of the file systems within the existing root boot pool. I have filtered out the swap and dump file systems from the list below, as we don’t need to archive these. In the list below, the ‘rpool/BOOT/be2’ file system is my boot environment ‘be2’, which is the one I want to boot when the SSDs are set up later.
# zfs snapshot -r rpool@20090827
# zfs list -t snapshot | grep 20090827 | grep -v dump | grep -v swap
NAME                                           USED  AVAIL  REFER  MOUNTPOINT
rpool@20090827                                  18K      -  81.5K  -
rpool/ROOT@20090827                               0      -    19K  -
rpool/ROOT/be2@20090827                       11.2M      -  6.14G  -
rpool/export@20090827                           16K      -    21K  -
rpool/export/home@20090827                    38.3M      -   481M  -
Now we have the snapshots available, the next step is to send streams of the files referenced by these snapshots to an archive file system for later retrieval. So next, I will create an archive file system. For this archive, I used my Solaris backup server, but I suppose you could use another pool on your NAS, if you can mount them when you later run the OpenSolaris 2009.06 boot CD, using ‘zpool import’ I suppose.
Here I’ll show you how to archive onto a separate Solaris box using NFS. Fire up the backup server and note its IP address. Then do the following on the backup server (‘zfsnas’ is the host name of the NAS whose root boot pool we are archiving):
# zfs create backup/snaps
# zfs set sharenfs='rw=zfsnas,root=zfsnas' backup/snaps
# share
-@backup/snaps  /backup/snaps   sec=sys,rw=zfsnas,root=zfsnas   ""
Send a single stream for all the files referenced by the recursive snapshot of all the root boot pool file systems. Substitute the IP address 192.168.0.45 with your own one. This is less typing than sending each file system stream individually and creates a single file, although it includes the dump and swap file systems, which are not required:
# zfs send -Rv rpool@20090827 > /net/192.168.0.45/backup/snaps/rpool.recursive.20090827
Alternatively, send individual streams of the files referenced by each of the root boot file system snapshots to the archive file system, excluding the swap and dump file systems:
# zfs send -v rpool@20090827 > /net/192.168.0.45/backup/snaps/rpool.20090827
# zfs send -Rv rpool/ROOT@20090827 > /net/192.168.0.45/backup/snaps/ROOT.20090827
# zfs send -Rv rpool/ROOT/be2@20090827 > /net/192.168.0.45/backup/snaps/be2.20090827
# zfs send -Rv rpool/export@20090827 > /net/192.168.0.45/backup/snaps/export.20090827
Now that the OS and related file systems have been archived, it’s time to shutdown the machine:
# shutdown -y -g0 -i5
Install OpenSolaris 2009.06 onto one of the SSD drives
Next I removed the old IDE hard drive, and plugged in the two SSD drives plus an IDE DVD ROM drive.
Then reboot and place the OpenSolaris 2009.06 install CD-ROM in the drive. Select keyboard and language and let the OS boot up to the desktop. Then open the terminal, and su to root with password ‘opensolaris’.
First step is to get the list of drives:
# format
Searching for disks...done

AVAILABLE DISK SELECTIONS:
       0. c8t0d0
          /pci@0,0/pci1043,8239@5/disk@0,0
       1. c8t1d0
          /pci@0,0/pci1043,8239@5/disk@1,0
       2. c9t0d0
          /pci@0,0/pci1043,8239@5,1/disk@0,0
       3. c9t1d0
          /pci@0,0/pci1043,8239@5,1/disk@1,0
       4. c10t0d0
          /pci@0,0/pci1043,8239@5,2/disk@0,0
       5. c10t1d0
          /pci@0,0/pci1043,8239@5,2/disk@1,0
       6. c11t6d0
          /pci@0,0/pci10de,376@a/pci15d9,a380@0/sd@6,0
       7. c11t7d0
          /pci@0,0/pci10de,376@a/pci15d9,a380@0/sd@7,0
Specify disk (enter its number): ^C
#
Drives 0 to 5 inclusive are the six drives that form the main storage pool, and drives 6 and 7 are the two 30 GB SSD drives that we will use to install the OS, make a mirror and then restore our previous boot pool to.
I will use drive 6 to install the OS to — i.e. c11t6d0. Double-click the Install icon on the desktop, select the drive to install to, and select “use whole drive” option. Installation to the SSD was amazingly fast — it only took 11 minutes!
After installation, click the reboot button in the installer, but keep the install CD in the drive.
Restoring the archived streams of the previous root boot pool
Boot the system with the OpenSolaris 2009.06 installation CD-ROM in the drive. The idea of this is that the zfs pools will be unmounted and then you can restore the archived streams to the root boot pool which will not be in use, as the OS boots from the CD.
Once the installer has booted, you’ve selected keyboard and language, and reached the desktop again, open a terminal and su to root, using password ‘opensolaris’.
Then follow the steps below to restore the archived OS file system stream(s). Now we have the root command line we can connect to the remote box, from where we’ll restore the file system streams. By the way, who is ‘jack’ ?
jack@opensolaris:~$ su
Password: ('opensolaris' is the default root password on the installation CD)

jack@opensolaris:~# zpool list
no pools available

jack@opensolaris:~# zpool import -f rpool

jack@opensolaris:~# mount -F nfs 192.168.0.45:/backup/snaps /mnt
jack@opensolaris:~# cat /mnt/rpool.recursive.20090827 | zfs receive -Fdu rpool  (full recursive stream)

(or for individual streams):
jack@opensolaris:~# cat /mnt/rpool.20090827 | zfs receive -Fd rpool
jack@opensolaris:~# cat /mnt/ROOT.20090827 | zfs receive -Fd rpool
jack@opensolaris:~# cat /mnt/export.20090827 | zfs receive -Fd rpool
jack@opensolaris:~# cat /mnt/be2.20090827 | zfs receive -Fd rpool
cannot mount '/': directory is not empty

jack@opensolaris:~# zfs list
NAME                       USED  AVAIL  REFER  MOUNTPOINT
rpool                     20.7G  8.57G  81.5K  /rpool
rpool/ROOT                16.2G  8.57G    19K  legacy
rpool/ROOT/be2            9.00G  8.57G  6.14G  /
rpool/dump                2.00G  8.57G  2.00G  -
rpool/export               506M  8.57G    21K  /export
rpool/export/home          506M  8.57G   481M  /export/home
rpool/swap                2.00G  10.5G   101M  -

jack@opensolaris:~# zfs list -t snapshot
NAME                                           USED  AVAIL  REFER  MOUNTPOINT
rpool@20090827                                    0      -  81.5K  -
rpool/ROOT@20090827                               0      -    19K  -
rpool/ROOT/be2@20090827                           0      -  6.14G  -
rpool/export@20090827                           16K      -    21K  -
rpool/export/home@20090827                        0      -   481M  -
Now, very importantly, set the boot file system to use the ‘be2’ boot environment, or whichever one you used:
jack@opensolaris:~# zpool set bootfs=rpool/ROOT/be2 rpool
Setup the SSD mirror
Open a terminal and su to root and take a look at the root pool:
# zpool status rpool
  pool: rpool
 state: ONLINE
 scrub: none requested
config:

	NAME         STATE     READ WRITE CKSUM
	rpool        ONLINE       0     0     0
	  c11t6d0s0  ONLINE       0     0     0

errors: No known data errors
Now let’s zap disk 7 (c11t7d0) and create a single 100% Solaris partition. Run format command, select drive 7 (c11t7d0), select the fdisk option and delete any existing partitions, then select the create option and select a 100% Solaris partition for the whole drive. Then select the option to save changes and quit from the format command.
Now transfer the volume table of contents from the first SSD to the second SSD:
# /usr/sbin/prtvtoc /dev/rdsk/c11t6d0s2 | /usr/sbin/fmthard -s - /dev/rdsk/c11t7d0s2
fmthard:  New volume table of contents now in place.
And finally, form the mirror by attaching the second SSD to the root pool:
# zpool attach -f rpool c11t6d0s0 c11t7d0s0
Please be sure to invoke installgrub(1M) to make 'c11t7d0s0' bootable.
Now install the GRUB bootloader to the second SSD so that the BIOS can boot the second drive in the event that the first becomes unreadable (don’t forget to enable the two SSDs in the BIOS as bootable drives afterwards!):
# installgrub -m /boot/grub/stage1 /boot/grub/stage2 /dev/rdsk/c11t7d0s0
Updating master boot sector destroys existing boot managers (if any).
continue (y/n)?y
stage1 written to partition 0 sector 0 (abs 16065)
stage2 written to partition 0, 271 sectors starting at 50 (abs 16115)
stage1 written to master boot sector
#
Good, now let’s checkout the mirrored root boot pool. As you see, an automatic scrub has occurred in order to resilver the second SSD from the first SSD in the mirror, as a result of attaching the second SSD to the pool:
# zpool status -v rpool
  pool: rpool
 state: ONLINE
 scrub: resilver completed after 0h2m with 0 errors on Fri Aug 28 20:40:36 2009
config:

	NAME           STATE     READ WRITE CKSUM
	rpool          ONLINE       0     0     0
	  mirror       ONLINE       0     0     0
	    c11t6d0s0  ONLINE       0     0     0
	    c11t7d0s0  ONLINE       0     0     0  5.46G resilvered

errors: No known data errors
#
Next I rebooted and checked if the boot environment was 100% as it was before. It was!
Conclusion
I now have a mirrored root boot pool on two SSD drives. Of course, other drives would work too. A much cheaper option would have been to use two small 2.5″ SATA HDDs to achieve similar results and for home / SOHO environments on a budget, this would make a cheaper alternative to using SSDs.
I must say that when I’m working on this box now, the speed with these SSDs is phenomenal, and well worth the money. Also, the boot and shutdown processes are lightning fast! With a single SSD read speed of around 240 Mbytes/sec, when using a mirror of two of these speedy drives on this new SATA controller card, it must be loading stuff incredibly quickly. During boot, I only see the HDD light on for about 2 or 3 seconds in total, and the rest of the time must be being spent starting services! I’ll maybe do a speed test one day…
The learning curve has enabled me to create archives of my boot environment from time to time, further protecting an already solid mirrored system boot environment, with multiple rollback boot environments to choose from should a package upgrade go wrong, coupled to a double-parity RAID-Z2 protected main storage pool. It doesn’t get much better than this! 🙂
Next I’ll have to chuck one of these SSDs into the Mac Pro case for the OS and apps. Anand Lal Shimpi of AnandTech highly recommends speeding up your ‘old’ Mac Pro with an SSD!
As these notes were taken in a fairly chaotic manner during attempts to get this to work, please notify me of any mistakes you find using a comment below. Thanks and I hope this post helps others wishing to do the same.
It’s a great feeling to know you have a robust OS boot environment, having a combination of a mirror plus multiple boot environment rollback capability to guard against upgrades that break stuff using the ‘update all’ feature of Package Manager.
I found the following URLs helpful when trying to get this to work, and would like to thank their authors for spending the time to document their efforts, which have benefited me here:
http://darkstar-solaris.blogspot.com/2008/09/zfs-root-mirror.html
http://malsserver.blogspot.com/2008/08/mirroring-resolved-correct-way.html
http://www.solarisinternals.com/wiki/index.php/ZFS_Troubleshooting_Guide#ZFS_Root_Pool_Recovery
And thanks to the helpful guys on the ZFS discuss forum for helping me with selecting a suitable 8-port SATA controller card, and the #opensolaris IRC channel guys for solving a problem I had.
For more ZFS Home Fileserver articles see here: A Home Fileserver using ZFS. Alternatively, see related articles in the following categories: ZFS, Storage, Fileservers, NAS.
Hi Simon!
First of all, i want to thank you for creating an excellent DIY NAS-guide!
It has been a great help for a unix newbie such as myself!
I have following this project with great interest and i also have pretty much the same hardware as you.
I have also run out of SATA ports and got a x4 RAID controller (LSI SAS 3081E-R),
too boot from (since the JMicron is giving me great headaches) and to add another RAIDZ.
Now i have run into another problem, i have tried contacting Asus but have not got a reply.
When i plug in the controller and try to boot, the motherboard (M2N-SLI Deluxe) is giving me
graphics error beep codes (1 long 2 short). No video is displayed and i think POST is not completed.
Motherboard probably thinks the raid controller is another graphics card and panics….
Have i missed anything? Are there BIOS settings i should check???
Best regards
/Ono
Oh, and the BIOS only seems to display a maximum of 8 drives in “Harddisk Drives” in Boot Menu.
I try to plug in a USB thumbdrive, OCZ Throttle eSATA SSD (i was trying to install Opensolaris on this but i have not succeeded), 6 SATA storage array, and the current boot IDE drive.
Somehow i always can see only 8 drives, always the SATA connected to the NVidia controller, but losing
one of the others…..
??????????
Thanks a lot Ono!
The LSI LSISAS3081E-R controller you have, and the SuperMicro AOC-USAS-L8i controller I have, both share the same LSISAS1068E ASIC, so should be pretty similar in terms of use with the motherboard’s BIOS and Solaris, I should expect.
Like you, I never had much luck with the JMicron SATA ports.
I presume your graphics card is a PCIe (PCI Express) card? I put my Asus EN6200LE PCIe-based card in the PCIe slot nearest to the CPU, and the SATA controller card in the PCIe slot furthest from the CPU, although I suppose you already tried swapping the cards around? I don’t know if it should make any difference, but you never know.
Also, you could try checking which motherboard BIOS version you are using and also the SATA controller card’s BIOS version.
As the motherboard’s BIOS can support 6 devices from the SATA ports driven by the NVidia chipset (MCP55) and 2 devices from the single IDE connector, I suppose it’s normal the BIOS only shows 8 devices (excluding the 2 possible JMicron devices).
The HBA card (LSISAS3081E-R / AOC-USAS-L8i) has its own POST messages that display the devices connected to the card, independently of the motherboard’s POST messages.
I don’t know how the motherboard’s BIOS handles external USB / eSATA devices.
Cheers,
Simon
Stupid me,i tried resetting BIOS and then it worked….
simple solution, should have thought about it.
Thank you so much anyway!
Best regards
/ono
Regarding the strain on the SATA-connectors – have you tried turning one of the SSD drives up-side-down?
Yes, I had that idea too. However I wasn’t sure of the cooling problems that might occur, but this turns out to be a non-issue as these SSDs are almost cold to the touch. Also, due to the thinness of the SSDs, turning them over might not give much space advantage, although it’s possible it might be enough to eliminate the pressure due to power cables colliding.
Also, I thought about rotating one of the SSDs through 180 degrees longitudinally, so that power & SATA cables are at opposite ends of the mounting bracket, but dismissed this as I didn’t really want cables in odd positions.
In the end I found a spare molex power connector coming from the PSU, and plugged in another cable with a male molex connector on one end and a SATA power connector on the other end. The wires leading to the SATA connector were routed directly to the end of the connector and were not pass-through (i.e. leading to another connector), and so this gave enough clearance. Problem solved.
Regarding additionnal SATA ports, I got off Ebay for 49 euro a
RAID DELL SAS 5/iR SAS/SATA PCI-E controller.
(Beware, there are 4 and 8 ports version).
The breakout cable must have cost me 9 euro extra.
Although the card is HW raid, I am using it under solaris as normal SATA controller.
I am under the impression that those DELL cards are LSI-chips based.
Yes, I think someone recommended one of those Dell PERC cards when I was looking at the SuperMicro AOC-MV8-SAT2 with PCI-X vs the SuperMicro AOC-USAS-L8i / LSISAS1068E-R choice. See if you can download the “LSIUTIL” utility from the LSI site and run it as root — it gives a lot of diagnostic info about connected storage devices including any hardware errors etc — very useful in pinpointing any pool checksum errors, for example.
For anyone interested, the SuperMicro AOC-USAS-L8i is a great 8-port SATA (or SAS) card under OpenSolaris, but it uses a bracket which you will have to unscrew to use it in a standard tower case — it’s really designed for use in SuperMicro UIO setups. The other good side is that it’s a good price. It uses the LSISAS106E ASIC. When fitted, there is no secure bracket holding it in place, but it seems to work fine.
The counterpart to the AOC-USAS-L8i card is another 8-port SATA/SAS card — the LSISAS3081E-R, which uses a conventional bracket, but costs more.
Now that SSDs are reaching speeds which are fast approaching the SATA II 3Gbps limit — e.g. my OCZ Vertex Turbo SSD boot drives read at around 240MBytes/sec, we should soon expect to see new releases of these SATA cards based on SATA III chipsets which are able to reach 6Gbps per channel. Then all we need is 10GbE ethernet switches and NICs to become mainstream and the speed of transfer will be phenomenal.
I’ve got a stack here of 20 or so video tapes which I’m editing, and so I get bored of waiting for large transfers of huge video files to transfer to long-term NAS storage across a slow 1GbE link at 50 MBytes/sec or so, so 10GbE will be great when it becomes more affordable.
10 GbE is currently way too expensive.
Why not use Infiniband? That’s becoming affordable right now. Just a direct connection between NAS and workstation, will cost you $300 (2 HCAs and a cable).
Very nice blog btw.
Hi Jan,
$300 looks to be a good price! Got any links? I will check it out.
Yes, I was looking at Infiniband a year ago as a possible direct-attach method here for video-editing storage:
http://opensolaris.org/jive/message.jspa?messageID=310488
The replier pointed out that:
(1) Although he was an Infiniband enthusiast, he felt that the 10GbE approach would be easier.
(2) 10GbE switches are the most expensive component and I could just eliminate the switch and go 10GbE NIC to 10GbE NIC directly without the need of a switch.
I didn’t go any further yet with the project, but as a year has passed since, I should take a new look at 10GbE NIC prices and compare with Infiniband… hopefully prices have gone down significantly… then again, maybe they haven’t?
Then again, new tech like Fusion-IO has come along — basically fast Flash on a PCIe-connected card as a much faster way to access local storage than SATA II/III devices etc.
See: http://www.fusionio.com/products/
Here’s a vid about it: http://www.youtube.com/watch?v=VS9Zxnx-r0E&feature=player_embedded
Steve Wozniak is onboard, so it looks like it should be very good 🙂
It looks like it has fantastic performance for niche storage needs, but it’s a bit pricey for now, and storage size is very limited 🙁
Thanks a lot.
Cheers,
Simon
HCA:
http://www.colfaxdirect.com/store/pc/viewPrd.asp?idproduct=12
See related items (below) for cable prices.
Thanks for the links, I will check them later.
It seems the problem with the Mellanox Infiniband HCAs your link shows is the issue of drivers.
E.g. the MHES14-XTC for $125 only lists Windows and Linux driver availability, so no use for me using Mac OS and Solaris.
So it seems likely that the Solaris poster was right when he mentioned that it would be easier using 10GbE to achieve fast speeds, as when 10GbE becomes more mainstream, drivers should be easier to find for mainstream OSes, indeed they will probably be included within the OS itself.
Hi again Simon,
I just realized that ZFS mirrors also self-heal. I was thinking to myself – Why is Simon going with mirrors rather than RAIDZ? Ah, now I know. Which makes it a very good option for booting, rather than RAIDZ, as the speed should be greater. Maybe this comment will spell it out for other people scratching their heads like I was.
http://blogs.sun.com/timc/entry/demonstrating_zfs_self_healing
Hi, yes at the time of writing this post, only mirror vdevs were available for creating redundant bootable OpenSolaris systems. I didn’t check recently but I expect this is probably still the case. As you can see above, it only took 2 minutes to resilver the second SSD when the mirror was created, which is pretty quick, although there was only 5.5GB of installed files.
Indeed, when ZFS is requested to read file blocks from redundant storage (mirror, RAID-Z1, RAID-Z2 & RAID-Z3 vdevs), if there is a block checksum error, ZFS will not only return the correct data, but it will also heal the problem. The read request may be in the form of either a file read or a scrub. As a user will never normally read all files back on a regular basis, this highlights the importance of performing regular scrubs, as this will be only real way that bit rot is detected and fixed.
During the heal process, for mirrors, the correct data is located on other drives within the mirror vdev, and in the case of RAID-Z1, RAID-Z2 & RAID-Z3 vdevs, the correct data is reconstructed using the available parity data.
Cheers,
Simon
Really good post, just setup root pool mirror based on the instructions.
So you added the mirror after the ZFS send|receive. Would it have made any difference to the mirror if you had done the transfer before adding the mirror? I think I read somewhere that the files that are mirrored are only those copied onto the drive after the mirror is established, but I might be wrong about that. Thanks for all of the great information!
Hello Simon.
I just built my own ZFS NAS with the OpenSolaris b134 developer’s release. (I really want to have Dedup! 🙂 However I am having difficulty getting VNC server to work. You mentioned that you had set it up and I know how you like to ride the bleeding edge, so I was wondering if you might have some pointers for getting it working on b134. By default it’s installing xvnc but all the guides I have found have been concerning SUNWxvnc, which is not installed by default. Any insights would be greatly appreciated.
-James
Hi Simon, where did you buy your card and controllers from? you’re listing prices in Dollars, but appear to be based in the UK?
I just want to thank Simon for all the good info and leave a tip for Colin and others. I’m not based in the UK so I cant vouch for availability but if you are looking for a good controller card the SuperMicro AOC-USAS-L8i, LSI SAS3081E-R and Intel SASUC8I are all the same card. I’m using the Intel card (OEM bonanza as the only part to name Intel is the invoice) as it was cheapest here in Sweden, about £140 shipped.
Hi Simon,
Apologies for posting a comment on such an old post, but wanted to give my thanks for your excellent guides. I’ve found myself following in your footsteps over the last couple of years, and recently ran out of disk space and acquired a SuperMicro AOC-USASLP-L8i (along with some splitter cables and a hotswap bay… and five more disks). Unfortunately I’m getting no joy from the AOC at all – it seems to fit in the second PCIe x16 slot (yup, I’ve got an M2N-SLI Deluxe too) although obviously it’s too short, and I’ve removed the backplane and anchored it with blu-tack. So far so expected. Unfortunately, I get no mention of the card on boot, and the OS seems to be completely oblivious to its existence. Certainly attaching a drive to it makes no difference to anyone. There are no signs of life on the card itself – I read somewhere that it has fault and activity LEDs but they seem to be invisible.
So my question is: did you need to do anything to the card to make it work in your setup? Change jumper settings, reset your BIOS (just flashed to 1804), flash the card’s firmware, some kind of moonlit ritual? Really keen to find out if there’s a missing step, because the alternative is that my card is duff. Trying to find another machine to try it out in, but it turns out that PCIe slots are quite hard to find on my remaining hardware.
Really grateful for any insight you can share, and thanks again for all the great work you’ve done for plebs like me who want to feel like they’re super, super-technical.
-Dave
Hi Dave,
I don’t remember doing anything special to get my card to work, so I’m not sure why the card isn’t showing up in the BIOS.
One thing that is different from my setup, apart from it being the low-profile version of my card, is that you’re using a hot-swap bay, so my gut instinct is that it is possible that the BIOS doesn’t support SATA hot swap – but I could be completely wrong on this. If I were you, I would research BIOS support of the hot swap SATA bay and see what shows up. Let me know what you discover, and I’ll try and help if I can.
Cheers,
Simon