 After you’ve bought your Shuttle XS35GT silent media center / HTPC, you’ll want to install some good software to make the system work well. Personally, I like the XBMC software, and here I’ll describe how to install it on the XS35GT.
In order to reduce costs, use less memory & disk space, and make the system run faster, I have chosen to install Ubuntu Linux with XBMC, rather than use Microsoft Windows.
Also, as the XS35GT contains no DVD or CD reader, we will be using a USB memory stick as a replacement for a CD/DVD boot/install media, so ensure you have one handy. A 1GB or 2GB device should be sufficient. The XS35GT refused to boot off one of my USB memory sticks and so I had to try another one that it would boot from, so if you get this problem just try another stick and you will be OK.
This installation how-to assumes you have installed a memory module and have either an SSD or HDD installed in the XS35GT case. I installed 2GB RAM, and a 60GB SSD, as the recent SSD price drops have made the 60GB SSDs not much more expensive than the 30GB models. If you will be using the XS35GT purely as a streaming client connected to a NAS, then a small capacity SSD/HDD like 30GB or 60GB is sufficient. Spending a small premium for a 60GB SSD will mean the SSD will continue to be useful after the 30GB one becomes insufficient in storage capacity.
Additionally, this guide assumes you have attached an MCE certified remote control unit, as this will work out of the box, with no extra work.
This guide also assumes you will be setting up wired networking. You can easily find instructions elsewhere if you need to get wireless networking working.
I would recommend plugging a USB keyboard into the XS35GT for the installation process, and also during the setup of XBMC.
If you find anything that doesn’t work, just leave a comment, preferably with a description of what’s wrong and what it should be, so I can correct it.
The guide is split into the following sections:
- Install the latest BIOS
- Change BIOS settings
- Install XBMC 10.0 Live (Dharma)
- Make the wired network work
- Make the wireless network work
- Get the HDMI audio working
- Get the Suspend / Wake working
- Customise XBMC settings
- Tuning the SSD
Install the latest BIOS
Before installing any software, I recommend downloading and installing the latest BIOS: version 1.09. However, I just took a look now and I can’t see the 1.09 BIOS, so it’s possible Shuttle removed this new BIOS recently — perhaps they noticed a serious bug? If you cannot see BIOS 1.09 or later, then you can skip this whole section and move on to installing XBMC etc. However, in future when a new BIOS comes out you may find these instructions helpful.
Download the version 1.09 BIOS here.
The BIOS file seems to be called XS35_SHB.109.zip.
Update: Due to people asking for this deleted BIOS 1.09, I have made it available here.
After downloading, unzip the BIOS files into a directory — let’s call it ‘bios’.
We’ll use a USB memory stick to install from, and we need to install a bootable copy of DOS to a USB memory stick, and then copy the ‘bios’ directory into the DOS directory on the USB stick.
The program we will use to create a bootable DOS on the USB memory stick is called UNetBootin and it can be downloaded from here.
The UNetBootin image allows you to install various operating systems to USB memory stick and we will use a free version of DOS called FREEDOS. Follow these steps:
- Format the USB memory stick as a FAT32 device using Windows or whatever
- Use UNetBootin to install FREEDOS 1.0 to the USB memory stick
- Copy the ‘bios’ directory onto the USB memory stick
- Boot the XS35GT with the FREEDOS usb stick
- Select FREEDOS Live (don’t accept the default which is to install to hard drive)
- From the DOS command line, type ‘C:’ and hit enter key, and then cd into the ‘bios’ directory where the BIOS files are (e.g. cd bios)
- Type ‘flash’ and hit enter
- Be sure to wait until the flashing of the BIOS has completed (don’t interrupt it or the XS35GT is probably toast)
Change BIOS settings
To enter the BIOS screens, turn the XS35GT on and hit the DEL key continuously on your USB keyboard until the BIOS screen is displayed.
If you managed to update to the new 1.09 BIOS, you will find a new item in the BIOS which allows you to enable the WLAN to be turned on permanently.
Also, whilst you’re in the BIOS turn on the AHCI mode for SATA, and on the Boot screen, change the boot order: make the first boot device the USB memory stick (must be plugged in whilst you’re in the BIOS), and make the second boot device the SSD or HDD that you will ultimately install Linux/XBMC onto.
Once all BIOS changes have been made, hit the F10 key to save your changes and reboot.
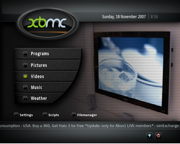
Install XBMC 10.0 Live (Dharma)
The next step is to download XBMC 10.0 Live from here.
Before we use UNetBootin to install the image to the USB memory stick, first we must format the USB memory stick as a FAT32 device using Windows or whatever.
Once you have downloaded the image file ‘xbmc-10.0-live.iso’ it’s time to run the UNetBootin program again. In the UNetBootin screen, select the ‘Disk Image’ radiobutton, and then click the button at the end of the row to locate the ‘xbmc-10.0-live.iso’ file.
Once you have located the ‘xbmc-10.0-live.iso’ file from within your file system, the next step is to select the target device to ‘burn’ the image to. This is the time to select the drive for your USB memory stick.
Then click the ‘OK’ button and wait until the image has been written to the USB memory stick.
You now have a bootable USB memory stick ready to install XBMC 10.0 Live to your XS35GT’s SSD or HDD.
Now insert the USB memory stick into one of the XS35GT’s five USB ports and boot the XS35GT. Assuming you changed the BIOS settings so that it boots first from the USB memory stick, you should see a GRUB bootloader menu screen, which has ‘UNetBootin’ written at the top. Now select the option to install XBMC Live.
Once the installation starts, you will be asked for country, language etc, keyboard type etc.
Soon you will see a red screen which informs you that the installer was unable to detect any network. We will fix this later. Just select the ‘continue’ option for now.
Next you will see the setup screens for which drive/partition to install to. I just selected ‘use whole drive’. Select continue and wait for the installer to complete installation.
Next you will be asked for a user name to create. Use anything you like, for example ‘media’ or ‘xbmc’ etc. Remember this and the password, of course, as you will need it later.
When the installer completes the installation, it will tell you to remove any installation media like CD, DVD or in our case the USB memory stick. Remove the USB stick and select ‘continue’ to reboot the system.
Make the wired network work
It’s odd that during installation, the installer fails to detect the wired network correctly, but it’s easy to fix as the required driver is already among the installed files.
Once the system has rebooted and you see the final XBMC screen, hit CTRL-ALT-F1 to enter a full screen session where you will be able to login.
Once you see the login prompt, enter the username and password that you created during the installation process. For example, let’s assume the user is called ‘media’.
Now do the following:
$ cd /lib/modules/2.6.32-26-generic/kernel/drivers/net/
$ sudo modprobe jme
Now that the driver is installed, you need to configure your network. For simplicity, I will assume your router contains a DHCP server to provide IP addresses to requesting connected network devices, such as your media center.
$ sudo nano /etc/network/interfaces
# add these 2 lines:
auto eth0
iface eth0 inet dhcp
Now save the file and quit editing the file.
At the command line again, type:
$ sudo /etc/init.d/networking restart
You should now have wired ethernet networking operational. Type the following to see your IP address:
$ sudo ifconfig -a
Under the ‘eth0’ section, look for the ‘inet addr:’ subsection and you should see a valid IP address there…
Make the wireless network work
If you intend to use the wireless networking (RTL8192SE), then update to BIOS 1.09 as it contains an option within the BIOS to keep the wireless networking on all the time. Once the BIOS is installed, using the method detailed above, enter the BIOS and select the option “wireless always on”.
Now it’s time to install the driver for wireless networking.
1. Download sources from here.
2. Compile:
$ cp -r /mnt/rtl8192se_linux_2.6.0017.0705.2010/ /usr/local/src/
$ cd /usr/local/src/rtl8192se_linux_2.6.0017.0705.2010/
$ make
# make install
# reboot
Maybe needed:
apt-get install build-essential subversion module-assistant
module-assistant prepare
3. Generate wpa-psk hex key
wpa_passphrase “wlan network name” “plaintext passphrase”
4. Edit /etc/network/interfaces and add the following:
auto wlan0
iface wlan0 inet dhcp
wpa-ssid “wlan network name”
wpa-psk “generated wpa key from step 3 or alternatively plaintext passphraase”
5. protect the network key
sudo chmod o=-r /etc/network/interfaces
Reboot and you should now have wireless networking.
Get the HDMI audio working
The next step is to get the HDMI audio working, otherwise you will most likely hear nothing when playing a movie or some music.
The sound hardware within the XS35GT has 2 audio ‘cards’ and each one has a ‘card’ number and a ‘device’ number. In order to get HDMI audio working, we need to obtain the ‘card’ and ‘device’ numbers. Do the following at the command line:
$ aplay -l (that’s a small ‘L’)
**** List of PLAYBACK Hardware Devices ****
card 0: Intel [HDA Intel], device 0: STAC92xx Analog [STAC92xx Analog]
Subdevices: 0/1
Subdevice #0: subdevice #0
card 1: NVidia [HDA NVidia], device 3: NVIDIA HDMI [NVIDIA HDMI]
Subdevices: 1/1
Subdevice #0: subdevice #0
We need to use the ‘HDA NVidia’ card and device number 3. So we will use card #1 and device #3 in this example. The numbers you see with your installation might be different, and if this is the case, you should use the numbers you see and not the ones in this example.
First we need to ensure that the mixer is not muted, which it is by default, or we will hear nothing. So return to the command line and type ‘/usr/bin/alsamixer’. Now hit F6 to select a different card, and then from the popup menu select the ‘HDA NVidia’ card. Once you have done that, hit ‘m’ to toggle the muting of the audio mixer channel. Ensure the display shows ‘OO’ instead of ‘MM’, as ‘MM’ indicates that it is muted. Then exit the utility.
Now check that the audio settings on your HD TV are set to digital. The reason I mention this is that on my first encounter with ‘alsamixer’, I still had no sound and I was wondering why. In the end, I discovered that my ALSA was working, but because of a default audio setting on my TV, where audio was set to ‘Auto’, I heard no sound from XBMC using the HDMI setting. To make it work correctly, I had to switch the audio output on my TV from its default ‘Auto’ setting to ‘Digital’, and then all was working well.
Optionally, you may add the following lines to the file ‘/etc/rc.local’ to ensure the audio mixer is unmuted after boot, although in this version of XBMC this was not required for my setup. Also below, are some additional items to (1) enable power to be supplied to the USB port next to the capped VGA port so that the IR receiver is able to wake the XS35GT from suspend mode, and (2) to make some SSD optimisations:
$ sudo nano /etc/rc.local
# Add the following lines:
# Unmute ALSA mixer so we can hear HDMI audio
/usr/bin/amixer -q -c 1 sset ‘IEC958’,0 unmute &> /dev/null
/usr/bin/amixer -q -c 1 sset ‘IEC958’,1 unmute &> /dev/null
/usr/bin/amixer -q -c 1 sset ‘IEC958’,2 unmute &> /dev/null
/usr/bin/amixer -q -c 1 sset ‘IEC958’,3 unmute &> /dev/null
# Enable USB0 port so it has power to respond to MCE remote wakeup: USB0 is the port next to the
# capped VGA port
echo USB0 > /proc/acpi/wakeup
# To check which USB ports are enabled during suspend:
# cat /proc/acpi/wakeup
# USB ports layout for the xs35gt:
# EUSB = front
# USB0 = back usb port next to the capped vga
# USB1 = next to USB1
# USB2 = back usb port next to the vga
# UBS3 = back usb port next to the lan
# Changes in this block are SSD optimisations that are required if you perform the SSD
# optimisations listed at the end of this guide.
# 1. Force filesystem to use noop disk scheduler (good for SSDs as no moving parts)
echo noop > /sys/block/sda/queue/scheduler
# 2. Discourage swapping to the max
echo 1 > /proc/sys/vm/swappiness
The last line of /etc/rc.local should be ‘exit 0’.
Get the Suspend / Wake working
To enable the system to be put into the low power suspend mode and to wake up from it, there are a few things you will need to do:
$ sudo nano /etc/rc.local
Then add the following lines:
echo USB0 > /proc/acpi/wakeup
echo EUSB > /proc/acpi/wakeup
echo USB1 > /proc/acpi/wakeup
echo USB2 > /proc/acpi/wakeup
echo USB3 > /proc/acpi/wakeup
exit 0
Ensure the last line of the file is ‘exit 0’ and then save and exit the file.
You only need to enable one of these USB ports, so once you find out which one your USB IR receiver is plugged into, you can comment out all except the line above required. The following describes the USB ports:
# USB ports layout for the xs35gt:
# EUSB = front
# USB0 = back usb port next to the capped vga
# USB1 = next to USB1
# USB2 = back usb port next to the vga
# UBS3 = back usb port next to the lan
To check which USB ports are enabled during suspend:
$ cat /proc/acpi/wakeup
Device S-state Status Sysfs node
P0P1 S4 disabled pci:0000:00:1e.0
AZAL S3 disabled pci:0000:00:1b.0
P0P4 S4 disabled pci:0000:00:1c.0
P0P5 S4 disabled pci:0000:00:1c.1
JLAN S3 disabled pci:0000:02:00.5
P0P6 S4 disabled
P0P7 S4 disabled pci:0000:00:1c.3
P0P8 S4 disabled
P0P9 S4 disabled
USB0 S3 enabled pci:0000:00:1d.0
USB1 S3 enabled pci:0000:00:1d.1
USB2 S3 enabled pci:0000:00:1d.2
USB3 S3 enabled pci:0000:00:1d.3
EUSB S3 enabled pci:0000:00:1d.7
Due to a LIRC device increment bug you will need to create the following script to help the device wakeup from suspend mode:
$ sudo nano /etc/pm/sleep.d/90_lirc
Now add the following to this file:
# Script to disable lirc before suspend and restart after wake.
case “${1}” in
suspend|hibernate)
if [ “$(pidof xbmc.bin)” ] ; then
wget -q -b -O /dev/null -o /dev/null “http://127.0.0.1:8080/xbmcCmds/xbmcHttp?command=ExecBuilt&Inparameter=LIRC.Stop”
fi
/etc/init.d/lirc stop
;;
resume|thaw)
# If remote still does not work after suspend, uncomment the lines below.
# Note you may need to change “lirc_mceusb”. See output from ‘sudo lsmod | grep lirc’ for module name.
rmmod lirc_mceusb
modprobe lirc_mceusb
/etc/init.d/lirc start
if [ “$(pidof xbmc.bin)” ] ; then
wget -q -b -O /dev/null -o /dev/null “http://127.0.0.1:8080/xbmcCmds/xbmcHttp?command=ExecBuiltIn¶meter=LIRC.Start”
fi
;;
esac
Now save and exit the file.
Now ensure the file has the correct permissions:
$ sudo chmod 755 /etc/pm/sleep.d/90_lirc
Sorry about the formatting, have to fix that later. If you find problems, please refer to this article.
Once you’ve done that, you’ll need to tweak a couple of XBMC settings.
In the System->Network menu, set the following:
Allow control of XBMC via HTTP: enable this
– Port: 8080
– Username: xbmc
– Password: ****
Web interface: default
Allow programs on this system to control XBMC: enable this
Allow programs on other systems to control XBMC: enable this (probably not required)
Now the last thing to tweak.
In the System->System->Power Saving menu, set the following:
Shutdown function: Suspend
In order to get round a bug that displays a black screen after resume, one user said that he needed to create the following file when using the wired network driver ‘jme’:
$ sudo nano /etc/pm/config.d/00sleep_module
Now add the following to the file:
SUSPEND_MODULES=”$SUSPEND_MODULES jme”
Now save and exit the file, and ensure correct permissions:
$ sudo chmod 755 /etc/pm/config.d/00sleep_module
Now when you push the power off button on the remote for the XS35GT, you should find that it goes into suspend mode. When you push the power on button on the remote, the XS35GT should resume and you see the XBMC screen.
Customise XBMC settings
Now there are some important XBMC settings to customise. Reboot your XS35GT and when you get to the XBMC screen, select the System menu, and perhaps System menu again.
Configure HDMI audio
Within the System->Audio menu ensure you have the following settings for HDMI audio to work:
Audio Output: HDMI
Speaker configuration: 5.1 (if you have a 5.1 surround sound system)
Audio Output Device: Custom
Custom Audio Device: plughw:1,3 (card #1 (HDA NVidia), and device #3 as shown in example above)
Passthrough Audio Device: Custom
Custom Passthrough Device: plughw:1,3 (card #1 (HDA NVidia), and device #3 as shown in example above)
There are a couple of other items you need to enable if you are using a Dolby Digital or DTS-capable receiver, often built-in to a good quality AV Receiver, for example a Denon AVR-1911:
Dolby Digital (AC3) Capable Receiver: enable this
DTS Capable Receiver: enable this
Now you should have working HDMI audio.
Configure VDPAU
VDPAU=Video Decode and Presentation API for Unix. This gives hardware acceleration for video presentation.
Now to get VDPAU working, go into the System->System->Video->Playback menu and enable the button for the “Allow hardware acceleration (VDPAU)”.
Configure Video source
Now to test out your setup for working network, sound and video, set up a video source. Assuming you are streaming video from your NAS, select the Video menu from the XBMC main menu and then select the ‘Add source’ item. Then select browse and select the ‘Add network location…’ menu item. This will then enable you to enter the network protocol (SMB/CIFS), server name/IP address of the NAS, the name of the share (shared folder), and the user name and password to use during access to the share. Once that works you are ready to test XBMC by playing your first video.
You will also want to calibrate the video output to fit your TV screen size correctly, and this can be found in the System->System->Video menu, if I remember correctly.
There are many, many more settings you can tweak, but these are the most important ones to set correctly.
Menu navigation sounds
One thing you might want is to hear the menu navigation sounds as you navigate the XBMC menus. One user explained how to do this here.
Tuning the SSD
Apparently, XBMC does not write heavily to the SSD, but if you use it in Library mode then XBMC will suck down lots of small image files, and so you might want to enable TRIM functionality, which has been backported and is available in the version of Ubuntu Linux installed.
If you decide to enable TRIM functionality then you might find this guide useful.
In addition to the mount option ‘discard’ to enable TRIM, I also:
* added the ‘noatime’ option to reduce writes to the SSD
* changed the default disk scheduler from [cfq] to [noop] as seek times are identical for all sectors on the SSD
* forced the ‘swappiness’ to 1 instead of the default value of 60 to reduce Linux’s aggressiveness for swapping to the minimum
That’s all folks!
Please report any errors or broken bits in the comments below.
Now it’s time to enjoy your HTPC / media center – have fun!
What a GREAT howto. I would never have solved the problems myself, and I am not a beginner at linux. Just followed your instructions from top to bottom and I now have a fine running XBMC.
Thanks a lot!
Thanks very much for putting this together! It saved me a lot of messing about.
A couple of notes for others:
I could not get the wireless working at all with BIOS 1.08 irrespective of the WLAN setting in the BIOS. With BIOS 1.09 it worked fine.
The unetbootin tool does not format your USB drive prior to putting the bootable OS on it. This led to some weird corruption errors on the USB drive for me. Formatting the USB drive first (mkfs.vfat /dev/sdb1) gave me a clean drive for the new BIOS install.
When I run ‘ sudo make install’, I get the following error:
make[3]: *** No rule to make target `kernel/bounds.c’, needed by `kernel/bounds.s’. Stop.
[prepare0] Error 2
I am a Linux beginner, so please help me solve this !
Thanks
Thanks for this guide, after following it exactly, I still seem to have a few issues with my setup.
1) After waking up from a suspend I seem to have lost the WLAN connection and the only solution is a reboot. I’ve tried to do a ‘$ sudo /etc/init.d/networking restart’, but this doesn’t help in that aspect. Note that I only lose the connection if the Shuttle has been on suspend for a longer time (ie. 10 hours or more).
2) General sound issues: I seem to have some issues with the sounds playing right. First of all there is no sound in the menus, not that I’m bothered with it, but it is pretty strange. Also, no matter what settings I use, I seem to have some issues with the 5.1 audio output. Somehow it seems that when I play 720p or 1080p films with surround sound, I get sound from all my speakers, but no dialog. This could be due to some of my settings I think.
3) Scraping of TV-Shows kills the machine: Whenever I scrape a TV-show the XBMC Live install completely freezes and becomes unresponsive for anything between 5-15 minutes. Best noticed by the clock stopping to update. I don’t know if this is something wrong with my install or if it’s a general problem with scraping from TheTVDB.com. At least it was a pain adding my 25 TV-shows, as it took nearly 12 hours to set it up.
Now when I add new episodes to the hard disk, XBMC doesn’t seem to recognize them before I’ve done maybe three or four ‘Scan for new content’ attempts. Even when setting the system to ‘Update library on start up’ I can’t get it to work properly.
Still, I’m grateful for your guide as it solved most of my problems. If you have any ideas or are willing to help, I would appreciate it very much.
Sincerely,
UnaX
Hi Erik,
Thanks and glad it helped.
Cheers,
Simon
Hi Jason,
Thanks for mentioning that one needs to format the USB memory stick – I’ll update the guide.
And yes, you’re right that WiFi will not work with the original 1.08 BIOS – you definitely need 1.09.
Cheers,
Simon
Hi Per,
If I remember correctly, one needs to issue the ‘make install’ command as the root user.
To become root user, type ‘su’ at the command line and enter the root user’s password.
Assuming it’s a fresh install, you may first need to set the root user’s password by typing something like ‘sudo passwd root’.
Good luck and hope it helps.
Cheers,
Simon
Hi UnaX,
Thanks and I’ll try to answer your questions:
1. I think there might be an issue with resume after suspend as I had a couple of resumes that didn’t work correctly. Maybe the next BIOS (1.10?) will fix these issues.
2a. Regarding clicks when navigating the menus, if you want to enable it, then try this: http://forum.xbmc.org/showpost.php?p=635394&postcount=330
2b. Regarding no dialog, but getting sound from all speakers, I’d need to ask a few more questions. I’ll assume you’re outputting from your XS35GT with the HDMI cable to an AV Receiver which then drives your 5.1 surround speakers. First thing is to enable the relevant settings in XBMC system settings (DTS capable, Dolby capable etc), also ensure that your receiver can process these audio streams. If you have an AV receiver, ensure that you have put it into the correct audio processing mode. I’ll wait for you to provide more details about your audio setup before I continue.
3. Scraping is not a fast operation, and personally I know that TheTVDB.com can be overloaded and so incredibly slow. The way I do this is with a program called Media Companion running in a Windows XP VM (on a Mac). Assuming correct name formatting, this will enable you to maintain and scrape TV & Movie folders. The goal is to create an NFO file for each TV show or Movie and suck down any required additional fanart and posters that will be displayed in XBMC in Library mode. Doing this on the NAS media folders for TV & Movie data will be easier as you scrape once and then after each successive XBMC client install, it will simply find the NFO file for each bit of video content in the NAS folders where the media & art content already is. See here for Media Companion, which is a very useful scraping tool: http://billyad2000.co.uk/
The idea of creating the NFO files on the NAS is that it means that XBMC will avoid going to the internet for the video content metadata as it will find it already within the NFO file in the folder on the NAS. Scraping from the internet is much slower than reading an NFO file plus any art files from your NAS.
Hope this helps.
Cheers,
Simon
Hi Simon,
first of all thanks for you time and willingness to answer my questions. I can already say that without this guide, I would never have bought the Shuttle XS35GT or gotten XBMC Live to work on it.
To answer the follow-up questions:
1) Today I noticed that there is no consistency in when the Shuttle loses the internet connectivity. I guess you’re right that we just have to wait and see if Shuttle is going to release a 1.10 version of the BIOS.
2a) The menu sounds is really not an issue for me, I just thought that I would mention it, if someone else should happen to stumble upon this when setting up the Shuttle. I’m actually quite happy without the sounds. I had already seen the solution from the link you gave me. Maybe you could add either the link or the solution to your guide if someone else would like them enabled?
2b) My sound goes through my television which is a rather old model, a Samsung LE27S7LB, and I think the issue here is that my Surround system is only connected with a regular double phono to phono cable and thus I can’t really use 5.1. A new television with a proper audio output would solve this and one is on the way very soon 🙂 I’ll have to make do with 2.0 and then have my receiver playing simulated 5.1 surround.
3) I’ve never had issues like this when scraping when I was running XBMC on my desktop computer running Windows 7 64-bit. I did notice that scraping was a lot better yesterday and went a lot faster. Maybe there were, as you mentioned, some issues with TheTVDB.com. The fact that all my media is on an External HD connected with USB 2.0, is probably not helping on the speed either. But thanks for the link to Media Companion, I will look into it and use it when adding new TV-shows.
Again, thanks for all the help and this great guide!
Sincerely,
Klaus
Hi Klaus,
No problem, and I’m glad the guide is helping yourself and others to get XBMC / Linux installed and working. To answer your replies:
1. Yes, I hope the next BIOS fixes the resume issue and also improves the WiFi situation, as I’ve seen some others complaining about WiFi issues – low signal strength, drop outs etc.
2a. Yes, I’ll add a bit how to get the menu navigation sounds. Thanks for the tip.
2b. Ah, your setup is like my old setup – putting 2.0 sound into 5.1 speakers is obviously never going to sound like proper 5.1 surround sound should. When you hook the XS35GT up to your AV receiver, and plug your 5.1 speakers into the AV receiver, all should sound much better, assuming the content you play has a surround sound format audio stream. And you’ll need to ensure in XBMC system settings that you enable Dolby digital + DTS audio settings.
3. Yes, I suspect the speed difference when scraping is due to the varying load on the TheTVDB.com website. There are lots of people hammering that site trying to update their TV shows etc. Sometimes it gets so bad that the scrape fails.
Good luck.
Cheers,
Simon
Hey again Simon!
I’ve stumbled over another issue with my XMBC Live install on the Shuttle and thought I’d give it a go here, since it seems you know more about these things that I apparently do 🙂
When using the YouTube plugin for XBMC, I get stuttering videos and no sound on most of what I try to play there. Searching around it seems that this is an issue with the AAC codec, but I’m not entirely sure. Is this an issue that you’ve noticed?
It actually happens on nearly all streaming services I try to use, which is kind of annoying. I could steer away from the services, but I thought I’d hear if you’ve had this issue and maybe even solved it?
Klaus
Thanks, this guide has been a great help!
However, I’m having problems with suspend/wake. I’ve followed your guide, but my shuttle won’t go into suspend – the screen briefly flashes, but that’s it.
I’m not sure, but in the suspend/wake section, shouldn’t “ExecBuilt&Inparameter” actually read “ExecBuiltIn¶meter”? (I saw this command in another guide).
I tried changing it, but it didn’t help, it still won’t go into suspend.
Any idea what the problem might be? I’d appreciate any advice you may have. I’ve never used Linux before, it’s quite daunting.
Tried again. It won’t shutdown or suspend from the XBMC menu either …
Got it working. Reinstalled from scratch as per your guide, but this time I enabled power to all USB ports during suspend (not just USB0). Maybe on my unit USB0 wasn’t the port above the capped VGA?
Hi Jason,
I had the same problem where initially I only enabled USB0 and it failed, so I enabled all USB ports and it suddenly worked. So at some time I’ll have to find the right USB port to enable, but it’s working now so…
Glad you got it working.
Cheers,
Simon
Thanks Simon. Your guide really was invaluable.
Klaus said:
>When using the YouTube plugin for XBMC, I get stuttering videos
>and no sound on most of what I try to play
Same deal here. I’m sending audio over hdmi to a Sony television. A considerable fraction of youtube videos make the TV say “Unsupported audio format”. I assume that xbmc needs to transcode the audio code to something the Sony TV understands. E.g. PCM. I’m not sure how to fix that.
Separately I also get “stuttering” audio which I can fix with an xbmc reboot. That’s probably a
driver bug (NVIDIA?).
Jason H.
Simon, just found a problem. All my HD movies, and SD/HD TV shows play fine, but most of my SD movies stutter badly – only 3-4fps. If I change the audio setting from HDMI to analogue the video plays smoothly (though no sound, of course). Have you experienced this problem? Any idea what might be causing it?
If anyone else is having the same problem as I am, here is a solution. In Settings – System – Audio Output:
Audio Output: HDMI
Speaker Configuration: 2.0
Boost Volume: enabled
Dolby Digital: enabled
DTS: enabled
Audio Output Device: HDA Nvidia hdmi
Passthrough Output Device: HDA Nvidia hdmi
The key setting seems to be speaker configuration. When configured as per Simon’s guide (5.1 enabled, plughw:1,3 for output devices) most of my SD movies wouldn’t play. When configured as per this post, playback of all files was smooth, and even though it was set to 2.0, my AV amp was still being passed Dolby Digital and DTS audio streams. I don’t know how or why it works, but it does. Something must be messed up in XBMCLive, I hope they sort it out soon.
Simon, is your installation playing SD movies without a problem?
Well, I have for now changed to analog audio as Jason mentions, as that seems to have fixed my stuttering issues.
I guess there is something wrong with the audio sent through HDMI or maybe it’s just my television which causes it, even though I doubt it. As the Shuttle get’s rather unresponsive too.
Thank you very much for this guide.
I’m a linux newb, and I’m having trouble following your instructions configuring the wireless networking. I’ve configured the BIOS, and downloaded the ‘source’ drivers. It was unclear to me what do to from there, so I just unpacked the drivers onto a usb stick and stuck it in the shuttle. I got to the command line screen using ctrl + alt+ f1, and I started typing in the first command line listed under “compile,” but I get an error message telling me there is no such file or directory. I tried simplifying the name of the folder, as you did with the BIOS installation earlier in the guide, but I get the same error.
If anyone has any advice, it would be greatly appreciated!
Anyone got the cardreader working?
Hi,
I just installed xbmc on my shuttle thanks to this guide, but can’t get the video output to go to HDMI. I did all the install with a vga cable but obviously would rather use HDMI for video and audio.
Any help appreciated!
Is it possible to see/access the bios when connected to HDMI? I have a blank screen during boot until the OS starts?
Is it just me or is that the way it is?
Thanks.
Many thanks for this guide!
Everything works like I want beside one thing… when I play an mp3 file or movie the first 2 seconds of the sound is cut off. Same thing when I skip/fast forward etc
I found this thread at xbmc.org but no solution. Anyone else that has this problem. ? I just updated XBMC from 10.0 to 10.1.. same problem What should I do, reinstall everything? 🙁
Hi Simon,
A great howto! I have almost the exact setup you described in your article. 2GB SO-DIMM, 30GB SSD, etc… so your guide was just what I needed.
However, my RealTek WiFi card is a RTL8191SE. The only difference appears to be that this is a 1T2R instead of the 2T2R in the RTL8192SE. I only purchased the unit in May 2011 but maybe I was sent an older unit? I have upgraded the BIOS and set the WiFi card to be “always on” but it only stays connected for a couple of minutes before dropping out. My workaround was to schedule a cron job that pings my router once a minute – this seems to keep the connection ‘alive’. Could this be a power-saving feature kicking in?
Thank you for taking the time to write this article.
Thanks! Great guide!
Basically following this and with some updated drivers, I got XBMC Live 10.1 working on XS35GT V2. I needed latest nVidia driver 275.19 (http://www.nvidia.com/object/linux-display-ia32-275.19-driver.html) for video and Realtek driver 2.6.0006.0321.2011 (http://www.realtek.com/downloads/downloadsView.aspx?Langid=1&PNid=21&PFid=48&Level=5&Conn=4&DownTypeID=3&GetDown=false&Downloads=true) for wlan. Basically I got HDMI video, analog audio and smoothly playing 1080p h263 over wlan.
When installing Realtek driver, do “sudo su” first before running make. “sudo make install” didn’t work for me and it failed to build “bounds.s”.
Do you know how to get the mic working for karaoke?
Looks like there a v10 BIOS
http://image.shuttle.com/ResourceCenter/download_file.jsp?file_id=15672
Sorry Vijay, I have no idea as I’ve never tried that.
Cheers,
Simon
Thanks for the tip off Dan – I’ll have to see what it fixes…
Cheers,
Simon
Hi
Thanks for this great guide!
It is just one thing i do not understand.
You say you your sustem is Ubuntu with Xbmc, but you install xbmc with a flashable usb stick. If you already have ubuntu installed cant you just install xbmc from the ubuntu repositories? or do you have a dualboot system? (ubuntu and xbmc seperat)
Thanks again 🙂
Simon, I am so grateful for your excellent guide. I am a big fan of the idea of community developed software, but whereas I’m a decently advanced user in the windows environment, I a perfect newbie when it comes to Linux. Grub, devs, echo commands – it’s all new to me and without your guide I would probably have given up and cursed at “stupid linux that can’t even load a standard network driver”.
In the hope that it may be of value to some people finding their way here, I can give the following report (in rough order of appearance) after a recent install of XBMC 10.1 (downloaded mid October) on an XS35GT:
– LAN fix still needed, I don’t use WLAN myself
– HDMI & ALSA tinkering not needed, just set “Audio output” to “HDMI” and “Audio output device” to “HDA NVidia hdmi” (within XBMC itself)
– after setting the USB echo commands in rc.local, suspend and resume (from an MCE remote) worked without further due (i.e. no need for “00sleep_module” or “enable http control etc”)
– lirc bug fix seemingly included in the release (script in /etc/sleep/99lirc-resume)
A general advice is to get Putty, which is a telnet client with which you can hook up to your XBMC command prompt via its ip address. It saves a lot of time and effort to be able to sit with the laptop on the sofa and do the tweaking (instead of sitting on the floor in front of the TV). It also has the added benefit of allowing copy-paste (paste => right click in the session) of any commands or scripts.
A final comment for those of you who, like me, use analogue output to an old fashioned stereo amplifier (above info about HDMI tested for the sake of this report) – beware! The Shuttle has a NASTY power off/suspend sound spike, first a sharp distorted “iiiii” and then a final “umpf”. Having some knowledge about hi-fi, I can say that it’s bad enough to potentially harm the loudspeakers if the volume is cranked up.
As a sidenote to the above, I may add that it seems to be a pure HW bug. I a moment of ambition, I copy pasted together a “mute sound at suspend” script (and had a Unix savvy friend polish off a “&” which was wrong). The script did work, for which I am immensely proud, but the problem persisted and hence my conclusion that it’s a HW bug.
Over and out and many thanks to Simon!
Will there be an update on this one for XBMC 12? I hope so =)
Many thanks!
David
Hi Simon, your blog helped me a few years ago when I installed XBMC Live on my XS35GT. TY for that.
I was wondering, have you upgraded to FRodo? From what I understand, it requires a fresh install, as there is no upgrade path possible.
Since my setup currently works flawlessly, Im a bit worried about attemping a fresh install.
Any one out there done this?
Hi Daniel,
It is really a very good post, i will also try to install software as per your instructions.